Friday, December 30, 2011

Champagne Risotto with Seared Scallops


I'm ashamed to admit it but this recipe was one of my very first requested recipes from one of my best friends. Almost 3 years later I am finally posting it! What's worse however is when I realised that I first made this for her 7 years ago!! How is that even possible?! So perhaps a little late but my excuse (for the past year anyway) was that she was pregnant and so wouldn't get as much satisfaction out of it as it just doesn't seem right to not enjoy a glass of sparkly either while making it or certainly whilst eating it!

For me this is home cooking but with a touch of real extravagance and luxury added in, making it the perfect meal to enjoy on New Year's Eve (or any other celebration where you will be cracking open a bottle of sparkly). I certainly wouldn't recommend opening an expensive champagne for this one but go for something that you are still happy to drink as you only need 250ml for the recipe – the rest is for drinking!

I can't think of a better recipe to end 2011 with and to welcome in 2012. I've had a fantastic year blogging and so thank you all for your continued support and following. I wouldn't continue to write and enjoy it as much if it wasn't for everyone of you! I hope you all have a great New Year and wish you all a very happy, healthy and safe 2012. Cheers! x

2 tbsp butter
1 tbsp olive oil
1 onion, finely diced
2 sticks of celery, finely diced
2 cloves of garlic, crushed
300g/ 10.5oz Arborio or carnarloni rice
250ml Champagne
750-1000ml chicken stock (approx)
2 tbsp parsley, finely chopped
Salt and pepper
4-5tbsp Parmesan, finely grated

12 scallops
1 tbsp butter
Drizzle of olive oil
Salt & Pepper
Pinch of White Mischief*(optional extra)

In a large frying pan heat 1 tablespoon of the butter with the oil until the butter has melted. Sauté the onion and celery gently for about 5 minutes and then add the garlic and cook for another minute or so.

Increase the heat then add the rice, coat well in the butter and onion mix and cook for 1 minute stirring constantly.

Add half of the champagne and stir. Once the rice has absorbed the champagne start adding the hot stock a ladleful at a time. Season and continue adding the stock and letting the rice absorb it before adding more. When the risotto is almost ready add the remainder of the champagne – you want to add this right at the end. Stir well then remove from the heat and sprinkle over the parsley, 4 tablespoons of Parmesan and the tablespoon of butter, cut into cubes. Cover and set aside for 1 minute to let the butter and cheese melt.

While the risotto is sitting at the very end heat a large frying pan until very hot. Add the butter and a drizzle of olive oil. Sprinkle the scallops with a little salt and freshly ground black pepper and if using the White Mischief rub. Add to the pan and cook for roughly 30 seconds per side until they are seared and golden. Remove from the heat and set aside.

Gently stir the finished risotto to mix in the melted butter and Parmesan then serve at once topped with the scallops. Drizzle over any extra butter from the scallops and if needed finish with a little bit of good quality olive oil. Delicious and luxurious all in one dish!

*I used a sprinkle of some White Mischief from my Laura Santtini Alchemist set which is a blend of Smoked China tea with jasmine and orange flowers, chilli and aromatic Sichuan peppercorns. It finished them off perfectly so if you are lucky enough to have it then I definitely recommend using it!


**This dish is also delicious on it's own without the scallops but additionally it goes well with some asparagus or for the ultimate luxurious meal, how about serving it with some freshly cooked lobster?! Amazing!

Thursday, December 29, 2011

Sweet Heat # 3 Round Up ~ Christmas


Well just like that Christmas has been and gone! I always find it amazing how you spend so much time getting organised and ready for the day and then before you know it's all over with for another year. That being said it was another great Christmas and so I hope you all had a lovely day however you celebrated it!

Amazingly despite all the busyness plenty of you still managed to take part in this month's Sweet Heat challenge where the theme was, of course, Christmas! There seemed to be a little confusion with the challenge this month as there were a few festive entries which all looked and sounded delicious however unfortunately didn't include the star ingredient of chillies! Since it was Christmas though and I'm still in the festive spirit I have included them in the Round Up but please make sure for future month's to include some spicy heat!

So without any further delay here are this month's Spicy Christmas recipes......

First up is Corina from Searching for Spice with her deliciously rich and decadent Chocolate Chilli Truffles – the perfect Christmas treat to give as a gift or to yourself!......


Next is Sadaf from My Culinary Adventures with her beautiful and spicy Indian Style Meatball Kabobs.......


Sweet Heat regular contributor (and next month's host!) is the lovely Michelle from Food, Football and a Baby with her fabulous looking festive Butter Chicken …...


My (first) entry for this month's challenge were my Chilli and Gold Flecked Lollipops which proved to be a lot more popular than I had anticipated with their sweet and spicy flavour combination.......


The second curry of the challenge and Francesa from Checky's Kitchen made a deliciously aromatic Thai Massamam Christmas Curry.......


Continuing with main courses and Sonali from Only Fish Recipes made this fabulous and spicy looking Karala Style Prawns Roast.......


Back to sweet treats and my second entry was my Chocolate Thins that were sprinkled with a good dose of dried chilli flakes and edible red glitter for that fiery festive finish!.....


Sneaking in at the end of the month and another Sweet Heat regular contributor, Janice from Farmers Girl pulls it out of the (Santa!) hat with her unbelievable sounding Chocolate Chilli Ice Cream! A definite must try.....


Next up is Ramkumari from Spicy Khana with her deliciously festive Homemade Chocolate......


Anjali from Sugar n Spice Tales made a wonderful looking African inspired Apple Paneer Mishrimava …........


And finally Kavi from Endless Entertaining made her fantastic version of an Eggless Molten Lava Cake – delish!


******
Thank you all for taking part in this month's Sweet Heat Challenge and making some truly spicy festive treats! Due to it being New Year's on the 1st, next month's Sweet Heat Challenge will be announced on the 3rd of January and is being hosted by the lovely Michelle over at Food, Football and a Baby so make sure to drop by and see what spicy theme she has come up with for January!

Sunday, December 25, 2011

Merry Christmas! {And my 12 Days of Christmas Round Up}


Yesterday was the final post of my 12 Days of Christmas series which can only mean one thing.......it's Christmas!! All of the days (and evenings!) of shopping, planning, decorating, wrapping and of course cooking, have all come down to this wonderful day. The stockings have been filled, the cupboards are full and the table is set so it is now time to relax and enjoy the day with family and friends.

I wish you all a very Merry Christmas and hope that you all have a lovely day, however you choose to celebrate it. Merry Christmas everyone and an extra special Merry Christmas to all of my family and friends in Scotland that we aren't able to be with . Have a wonderful day. Lots of love xxx

***
And so to complete my 12 Days of Christmas here is a quick round up of all of the recipes - all of which will be eaten or drunk at some point today! Yep, 12 days to create, 1 day to demolish! Enjoy.....

Day 1

~
Day 2

~
Day 3

~
Day 4

~
Day 5

~
Day 6

~
Day 7

~
Day 8

~
Day 9

~
Day 10

~
Day 11

~
Day 12

***
And that's it!
Merry Christmas and Cheers!

Saturday, December 24, 2011

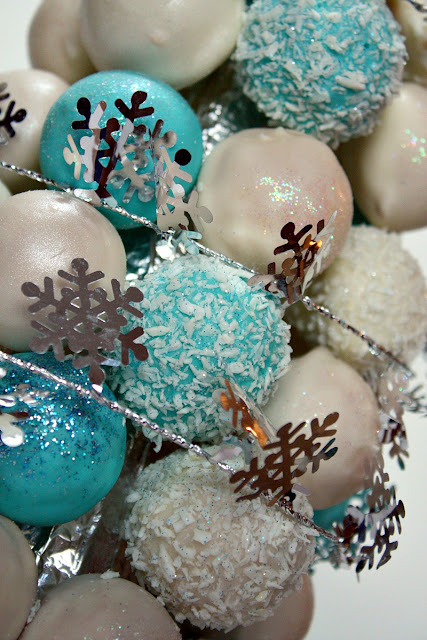
The 12 Days of Christmas ~ Day 12: Cake Pops Christmas Tree


The last and final day of my 12 Days of Christmas and I had to end on a high note, so for my Twelfth Day I present my Cake Pops Christmas Tree!

I had always planned to do cake pops but just wasn't sure how best to present them and so I have to thank Buttercream Blondie for the inspiration after seeing her fantastic Cupcake Tree! Although it looks like a lot of work it really isn't too bad and to be honest I had so much fun making this. I made this for a party we were at and it was the perfect dessert to take as not only are they delicious bites of cake, but it makes a beautiful centerpiece for the table. It certainly got everyone talking – that is when their mouths weren't full of cake!!


Friday, December 23, 2011

The 12 Days of Christmas ~ Day 11: Smoked Salmon Dip


Day 11 of my 12 Days of Christmas and it's back to savoury with my Smoked Salmon Dip. Like a lot of people we always have Smoked Salmon at Christmas and so this is just a slightly different way to serve it. Even better, you can make it in advance so it's one less thing to do on Christmas Day! This is a perfect addition to your lunch or it makes an elegant and beautiful starter, especially when served with some extra smoked salmon on the side. Delicious.

100g cream cheese, softened
50g sour cream or Greek yogurt
Squeeze of lemon juice
1 tsp horseradish
1 tbsp fresh parsley, finely chopped
1 heaped tsp fresh dill, plus extra for garnish
Salt & Pepper
125g Smoked Salmon

Put the cream cheese in the bowl of a KitchenAid (or other electric mixer) and beat using the paddle attachment until completely softened and creamed. Add the sour cream (or Greek yogurt), lemon juice, horseradish, parsley and dill and beat until everything is well mixed. Finely chop the smoked salmon then add to the cream cheese mixture along with a little salt and a good grinding of black pepper. Mix one last time so that the salmon is evenly mixed in with everything else then taste to check the seasoning. Adjust if necessary, adding more lemon if needed then put into a serving bowl and keep in the fridge until needed. Serve with a little extra dill sprinkled on top and some crudites, crackers or even some thinly sliced crostini on the side. Perfect!

Or how about my Smoked Salmon on Spring Onion Pancakes,

or my hot and oozy Spinach and Artichoke Dip.

Thursday, December 22, 2011

The 12 Days of Christmas ~ Day 10: Christmas Cookies


Well just like I can't have a celebration without Cupcakes, you can't have Christmas without some Cookies and these are my favourite cookies to make for Christmas. They do take a bit more time (especially in comparison to my Cranberry & White Chocolate Cookies) but I think they are well worth the effort. Besides I find it quite relaxing and fun to sit down and ice them! It also makes a great project to do with children and as well as getting to eat delicious, iced cookies they make fantastic and unique name settings for your Christmas Day table!

This is my standard cookie recipe for when I make Iced Cookies (courtesy of Peggy Porschen and her beautiful books) and is the same one that I used for my Valentines Cookies, I just used a vanilla bean instead of the lemon zest, but if you prefer you could flavour them with lemon, orange or even lime zest for a fruity flavour.


200g unsalted butter, softened
200g caster or berry sugar
1 vanilla bean, seeds scraped out
1 large egg
400g all-purpose or plain flour

To decorate:
12g / 1 heaped tbsp dried egg white powder (meringue powder)
500g icing sugar
1 tsp lemon juice
5-6 tbsp water
Food colouring – red/ green/blue
Edible glitter

Cream together the butter, sugar and vanilla (or other flavouring of your choice) using an electric mixer. Be careful not to over mix as this can cause the mixture to spread during baking. Lightly beat the egg then mix into the cream and sugar until well mixed. With the mixer on low gradually add the flour until a dough forms. Take the dough out and form it into a large disc then wrap in cling film and chill for at least 1 hour.

Line a baking tray with baking parchment or greaseproof paper.

Sprinkle some flour on a large chopping board or your work surface. I tend to cut the dough in half and work on one half at a time. Put the dough onto the floured surface and knead slightly before rolling out to roughly ¼ inch in thickness. Using cookie cutters of your choice cut out the shapes and carefully place onto the lined baking tray. Once they are all cut out chill the cookies for another 30 minutes.

Preheat the oven to 350F/ 180C/ GM 4. Bake the cookies for 8-12 minutes, depending on the size, until they have just turned golden-brown at the edges. Remove from the oven and let cool on a wire rack.

While the cookies are cooling make up your icing. Sift the dried egg white (meringue powder) and icing sugar into the bowl of a free-standing mixture or large bowl, then add the lemon juice and 5 tbsp of water. Starting on a very low setting mix everything together then increase the speed and mix until well combined, glossy and smooth. In order to pipe the outlines you want the icing to be fairly thick so don't be tempted to thin it too much.

Divide the icing into bowls depending on how many colours you want to make, then add a little food colouring to each bowl (I use gel paste food colouring so it doesn't thin the icing anymore and use a cocktail stick to add the colouring – a little goes a long way!).

Put a little of each icing into a piping bag – I use sandwich bags then cut the very corner off so you just have a small hole. Carefully pipe the outline of the cookies. Once they have all been done you can add a little extra water to each icing to thin it slightly. Spoon some icing into the centre of each cookie and carefully let it flood to the edges, helping it with the back of the spoon or a small spatula (or in extreme cases – ie. Very small areas, I have even used a toothpick!). Once the cookie is evenly covered set aside and repeat using up all of that colour. Once you are finished sprinkle over the edible glitter if using then let dry completely. Repeat with all of the cookies and continue to decorate as you please. The perfect Christmas cookie, place setting or gift!


Wednesday, December 21, 2011

The 12 Days of Christmas ~ Day 9: Christmas Bruschettas

I thought I should probably take a break from all of the sweet treats I have been making for Christmas and my 12 Days of Christmas and post these delicious Christmas Bruschetta's. I'll be making these on Christmas Day to serve at lunch time (along with our Broccoli & Nutmeg Soup) but again they also make a fantastic starter. If it's easier you can grill the bread ahead of time so all you have to do is put on the toppings. Pretty, festive and very delicious!

Goats Cheese & Pomegranate


More pomegranate but I just can't resist its stunning sparkly gems and delicious taste. It works so perfectly with the tangy goats cheese and provides a wonderful refreshing taste and pop of flavour when you bite into it.

I haven't given precise measurements for any of these recipes since it depends entirely on how many people you are feeding and how much you want to make.

Ciabatta bread (or something similar)
Olive oil
Garlic, clove(s) sliced in half lengthwise
Goats cheese
Lemon zest
Fresh parsley, finely chopped
Pinch of Maldon Salt and black pepper
Pomegranate seeds

Slice the ciabatta into fairly thin slices (roughly 1cm thick) then drizzle with some olive oil. Toast the bread using a paninni press or under the grill until just golden then remove and rub a little of the garlic on it before allowing to cool.

While the bread is toasting, in a small bowl mix together the goats cheese with some lemon zest and a good sprinkling of fresh parsley. Season then mix together using a fork. Taste to check everything is balanced and adjust if necessary.

Spread the goats cheese over the ciabatta then sprinkle over the pomegranate seeds. Finish with a drizzle of good quality extra virgin olive oil then serve and watch them disappear in a flash!


Gorgonzola, Bresaola & Rocket


For some reason, I always think of blue cheese as being fairly Christmassy. I'm not entirely sure why – whether its because we used to always get some lovely Stilton as a present (along with some delicious condiments and chutneys), or the fact that there is always a cheese board at some point over the Christmas period that always includes it.... I can't decide my reasoning but anyway, for me this Gorgonzola, Bresaola & Rocket Bruschetta is the perfect wintery, Christmassy Bruschetta!

Ciabatta Bread (or something similar)
Olive oil
Garlic, clove(s) sliced in half lengthwise
Rocket leaves (arugula)
Gorgonzola or other blue cheese of your choice
Bresaola ham
Spritz of lemon juice
Freshly ground black pepper
Extra virgin olive oil

Slice the ciabatta into fairly thin slices (roughly 1cm thick) then drizzle with some olive oil. Toast the bread using a paninni press or under the grill until just golden then remove and rub a little of the garlic on it before allowing to cool.

When ready to assemble simply put a little rocket on each piece of ciabatta then top with a slice of cheese. Spritz with a little lemon then top with a slice of ham. Finish with a grinding of black pepper (optional) and a drizzle of extra virgin olive oil. This is a bruschetta not to be messed with!


Mozzarella & Chilli


This is just my classic Mozzarella & Chilli Bruschetta that I make in the summer, the only difference being I've used parsley instead of basil but I thought since it's a favourite of mine it has to be included at Christmas time – especially since the natural colours of the dish are perfect for Christmas time!

Ciabatta Bread (or something similar)
Olive oil
Garlic, clove(s) sliced in half lengthwise
Mozzarella
Red Chillies (or if you like you can use a mix of red and green), finely chopped
Fresh parsley, finely chopped
Maldon sea salt (or other finishing salt)
Extra virgin olive oil

Slice the ciabatta into fairly thin slices (roughly 1cm thick) then drizzle with some olive oil. Toast the bread using a paninni press or under the grill until just golden then remove and rub a little of the garlic on it before allowing to cool.

Tear the mozzarella into pieces then top the ciabatta with it. Finish off by sprinkling over the chopped chillies, parsley and salt then drizzle over a little good quality extra virgin olive oil. My favourite!


Tuesday, December 20, 2011

The 12 Days of Christmas ~ Day 8: Christmas Cupcakes


Well it just wouldn't be a celebration without some cupcakes, so here for Day 8 of my 12 Days of Christmas are my Christmas Cupcakes! At this time of year I actually prefer to make my vanilla cupcakes since I find there is so many other things with spices and fruits in them, so this makes a lovely light change. That being said if you prefer you could easily add the zest from a couple of clementines to the cake mix instead of the vanilla or why not try adding some cinnamon for a cinnamon cupcake!

I decided to keep the icing nice and simple meaning that these cupcakes take no time at all to make (and even less time to eat and enjoy!) and finished them off with some edible stars and glitter for a festive sparkle!

Makes 12 cupcakes

120g plain or all-purpose flour
140g caster or berry sugar
1 ½ tsp baking powder
a pinch of salt
40g unsalted butter, softened
½ tsp vanilla extract
120ml milk
1 egg

Royal Icing:
225g icing sugar
2 tsp {6g} dried egg white powder {white meringue powder}
Few drops of vanilla extract (optional – if you are keeping the icing white I wouldn't recommend it!)
2-3 tbsp water
Food colouring of your choice (or keep it white)

To Decorate:
Edible gold stars and glitter

Preheat your oven to 170C/ 325F/ GM 3 and line a cupcake tin with medium sized paper cases.

Place the flour, sugar, baking powder, salt and butter into the bowl of a KitchenAid (or other freestanding mixer) and using the paddle attachment mix slowly until everything is combined and you have a sandy consistency (if you don't have a KitchenAid use a hand-held electric beater). While the mixer is running, slowly pour in half of the milk and mix until it's just incorporated. Add the egg to the remaining milk along with the vanilla and continue beating until it's mixed in. Scrape down the sides of the bowl to make sure everything is properly mixed but be careful not to over beat the mixture.

Evenly spoon the cake mixture into the cupcake cases and bake for 20-25 minutes until the sponge bounces back when touched (with my oven 22 minutes works perfectly every time) and a skewer comes out clean when put into the center of the cake. Leave to cool for a few minutes then transfer the cupcakes onto a wire rack and allow to cool completely.

While the cupcakes are cooling make the icing. Sift the icing sugar and the dried egg white powder/ meringue powder into a medium sized bowl then add the vanilla (if using) and enough water to make a smooth icing – you don't want it too runny so I add the water a tablespoon at a time, until I get the right consistency. If you are colouring the icing divide it into bowls then add a little food colouring to each bowl and mix well. When the cupcakes have completely cooled spoon over the icing so that you have an even, glossy and smooth cover, then finish with a sprinkling of stars and glitter.

Monday, December 19, 2011

The 12 Days of Christmas ~ Day 7: Pomegranate Sorbet


Day 7 of my 12 Days of Christmas and I couldn't resist making a beautiful sorbet using seasonal pomegranates – a favourite in our house! This makes a lovely and light dessert or you could serve it as a palette cleanser during courses. Simple to make, delicious to eat!

125g sugar
125ml water
500ml pomegranate juice
Squeeze of fresh lemon
Pomegranate seeds for serving (optional)

Put the sugar and water in a small pan and gently heat until the sugar has completely dissolved. Leave to simmer for 10 minutes to make a sugar syrup then set aside and allow to cool completely.

Pour the pomegranate juice into a large jug and add a good squeeze of lemon juice (I would say roughly half a lemon). Once cooled add some of the sugar syrup – the amount needed will depend on the tartness of your pomegranate juice and your own individual tastes - and taste to see if it needs more lemon. Pour the mixture into an ice cream maker* and churn following your manufacturers instructions until frozen and smooth. Transfer the sorbet to a freezer-proof container and keep until needed.

Remove the sorbet from the freezer about 10 minutes before you want to serve to allow it to soften a little then serve in individual glasses. Top with some fresh pomegranate seeds if you like and for total extravagance top up with some sparkly wine for the ultimate light and easy sparkly dessert!

*If you don't have an ice cream maker simply put the juice mixture into a freezer-proof container and put in the freezer. After a couple of hours take it out and mix it up really well then return it to the freezer. Repeat that process then allow to freeze completely.

Sunday, December 18, 2011

The 12 Days of Christmas ~ Day 6: Chocolate


Day 6 of my 12 Days of Christmas features Part 2 of my Edible Gift Ideas (click here for Part 1) which has to be Chocolate! I know, I know, how I have reached Day 6 and not included Chocolate yet is a bit of a miracle (or perhaps bad planning!!) but boy have I made up for it with this post! So without further ado, here are some beautiful and delicious Chocolate edible gifts.

Chocolate Thins


Saturday, December 17, 2011

The 12 Days of Christmas ~ Day 5: Chilli & Gold Flecked Lollipops


So already we are onto Day 5 of my 12 Days of Christmas and rather than 5 gold rings I just couldn't resist posting these Chilli & Gold Flecked Lollipops! They make fabulous gifts as they look so pretty and taste amazing. Don't be alarmed by the chilli – the sugar calms it down so you are just left with a nice warmth rather than crazy, overpowering heat, but perhaps keep them for the adults and maybe don't give these as a gift to your dentist!
  
Since they fit the bill perfectly I also decided to double up and have these as my Sweet Heat entry for December. This month's spicy challenge is Christmas so these are just perfect. If you like spice you can always add more chilli but please try these – they are fantastic for a sweet little treat!


Makes roughly 8-10 lollipops (easily doubled)

125g sugar
60ml golden syrup or liquid glucose
60ml water
½ - 1 tsp dried red chilli flakes
Edible gold leaf or glitter (optional)

Line a large baking sheet with parchment paper (or 2 smaller ones) and have your lolly pop sticks ready.

Put the sugar, syrup (or glucose) and water into a pan and gently heat, swirling the pan from time to time (do not stir it!) until the sugar has dissolved. Once it's dissolved increase the heat slightly and bring to a boil. If there is any crystallised sugar on the side of the pan brush it down with water using a pastry brush. Continue to boil the mixture until it reaches 150C/300F on a sugar thermometer – this will take roughly 15 minutes.

To check that the sugar is ready dip a teaspoon into the mixture – just a little – then put it into a small bowl of water. Leave for a minute or 2 then feel it – it should be hard and brittle when you try and snap it. Once ready remove from the heat and add the chilli. Using a tablespoon carefully spoon rounds of the caramel onto the lined baking sheet until you have used up all of the caramel. Press a lolly pop stick into each lolly then sprinkle with some edible gold leave or glitter if using. Leave to cool completely then wrap in individual wrappers for the perfect sweet and spicy treat!

*Please be extremely careful when making these as the sugar is extremely hot and can really burn – trust me, I have an old scar to prove it!

For some other edible homemade gift ideas why not try my Pink Champagne Truffles for a decadent and beautiful present for someone special, or a bag of Chocolate and Caramel Popcorn.

Or for something savoury how about my Spiced Chilli Black Pepper matched up with some homemade Gourmet Salts and some fragrant Flavoured Oils. Personal and delicious – a perfect present!

Friday, December 16, 2011

The 12 Days of Christmas ~ Day 4: Gingerbread


Day 4 of my 12 Days of Christmas continues with another firm favourite in our house – Gingerbread!

I can't think of many other things that fill the house with the smell of Christmas quite like Gingerbread. I have Nigella to thank for this recipe, well actually I think we all have her to thank as I'm pretty sure you will want to try this one out! I always make 2 batches of this – one to pop in the freezer for when I have people coming round, and one to devour myself as it is impossible to make this and not enjoy a piece while it is still warm. My only word of advice for eating this is to make sure you sit down with a cup of tea, put your feet up and don't attempt to do anything else as it is so deliciously sticky you will only make a mess!

150g unsalted butter
200g golden syrup
200g black treacle or molasses (I use molasses)
125g dark muscovado sugar
2 tsp finely grated fresh ginger
1 tsp ground ginger
1 tsp ground cinnamon
¼ tsp ground cloves
1 tsp bicarbonate of soda (baking soda), dissolved in 2 tbsp warm water
250ml milk
2 eggs, beaten
300g plain or all-purpose flour

Icing sugar to decorate (optional)
Edible glitter in white or silver (optional)

Preheat the oven to 325F/ 170C and line an ovenproof baking dish with baking parchment (approx. 30cm x 20cm x 5cm – however I used my square one which is 26cm x 26cm).

Put the butter in a medium sized pan along with the syrup, molasses or treacle, sugar, fresh ginger, ground ginger, cinnamon and cloves and gently heat until the butter has melted.

Remove from the heat then add the bicarbonate of soda and water mixture, milk and the beaten eggs and stir well.

Put the flour into another bowl (If you have a stand mixer put it into that bowl) and then add the liquid ingredients and beat well until it is well mixed. Pour the mixture into the lined baking dish – it will be very runny, but don't be alarmed, it should be like this – and bake for 45-60 minutes (50 minutes works well for me). Once ready it should be nicely risen and firm on top. As Nigella says, try not to overcook it as it will continue to cook a little as it cools.

Transfer onto a wire rack and let the gingerbread cool in the tin. If you like you can freeze it at this point but I can never resist a slice (which is why I always make 2 cakes!) so I sprinkle it with a snowy and powdery dusting of icing sugar and of course a touch of edible glitter before cutting into nice squares and enjoying with a hot cup of tea.

Thursday, December 15, 2011

The 12 Days of Christmas ~ Day 3: Cranberry and White Chocolate Cookies


I don't make a lot of cookies, but when I do these are top of my list as they are are so good and it just wouldn't be Christmas without them! The combination of the juicy, tart cranberries with the sweet white chocolate is a match made in heaven. These have become our annual cookies for enjoying while decorating the Christmas tree with a mug of steaming hot chocolate but they are perfect for any occasion whether it's writing your Christmas cards, for a cookie swap, to take to a party as a hostess gift or simply for just sitting down with a good cup of tea and putting your feet up for a moment! They won't last long though so you might want to make a couple of batches....and if that doesn't tempt you they also freeze well so you can make them in advance, keep a few for yourself and freeze the rest for whenever you need them. One thing's for sure though, if you leave these out for Santa you will definitely top the 'nice' list!

Makes approx. 15 - 20 cookies depending on how big you make them.

150g all-purpose or plain flour
½ tsp baking powder
½ tsp salt
100g rolled oats
125g soft unsalted butter
75g dark brown sugar
100g caster sugar
1 tsp vanilla extract
1 large egg
100g dried cranberries
150g white chocolate chips

Preheat the oven to 350F/ 180C and line 2 baking sheets with greaseproof paper then set aside.

Put the flour, baking powder, salt and oats into a bowl and mix then put to the side.

If you have a KitchenAid (or other stand mixer) put the softened butter and both the sugar into it then using the paddle attachment beat together until softened and creamy. (If you don't have a stand mixer use either a hand mixer or just some good old fashion arm power!) Add the vanilla and egg and continue to beat until it is properly mixed in, making sure to stop and scrape down the sides of the bowl.

Add the flour mixture and continue to mix until combined then turn the mixer off and remove the bowl before folding in the cranberries and chocolate.

You can either roll tablespoons of the mixture with your hands or if you have one I use a medium sized ice cream scoop, which in my opinion makes the perfect sized cookies (plus it's easier and they are all evenly sized!). Either way put a good sized spoonful of the cookie mixture onto the lined baking sheets, leaving spaces in between each one. Gently press down the cookies a little to flatten them slightly then bake in the oven for 15 minutes. After 15 minutes they will still feel a bit soft but should be a light golden colour so remove them and leave on the baking tray for 5 minutes in which time they will harden. Transfer the cookies to a wire rack and allow to cool (as long as you can patiently wait!) before treating yourself to the most delicious and easy Christmas cookie!

Related Posts Plugin for WordPress, Blogger...